Thursday, January 31, 2019

(ab)using Veeam Endpoint Backup Free as a P2V solution

I was wondering if we could use the combination Veeam Endpoint Backup Free Edition and de bare-metal restore ISO to convert a physical PC into a VM running on ESXi. 

To be short: the answer is YES

And it's pretty simple too.  Maybe you already played around with the Veeam Endpoint Backup solution to safeguard your own desktop/laptop,... During the initial configuration process you have the ability to create a bootable ISO for bare metal restores.

This bootable ISO includes all necessary drivers to perform a bare metal restore on the same hardware, but what if we try to boot this ISO on a VM ? In the most ideal situation, you just create a new VM with the same amount of memory and vCPU, but I've tested it with less and it's working too.

More tricky is the provisioning of disk space. Make your disk big enough!  Thin provisioning is fine, but you'll avoid a lot of issues when you reserve enough disk-space. Later on I'll show you what your options are when you didn't had enough disk available.

So, to start, we just create a blank VM with a corresponding OS profile.

integri blank VM Veeam P2V


On the ESXi environment, add some CPU, memory and don't forced the hard-drive !

configure VM integri services

Now that we have our empty VM with sufficient disk, we mount the ISO, which we created during our backup of the physical machine and boot the VM.

optimize VM esxi by integri

It's alive !

migrating and optimlizing your IT environment

The Windows PE environment will come live and from the initial screen we can choose to perform a bare-metal restore. 

veeam restore by integri services

veeam backup and replication bare metal restore provided by integri


The only challenge now is to gain access to the backup-file. In my lab, I used my NAS which contains the VBK-file. 


configuring virtual environment


So after entering a valid IP configuration in network settings, I was able to browse to my network location and select the corresponding backup file. The default network drivers enable you to create a working Ethernet connection in the PE environment.

configure ethernet network interface with integri

secure access to network shares by integri

The network location is scanned and all available backups are shown.

restore backup incremental full veeam

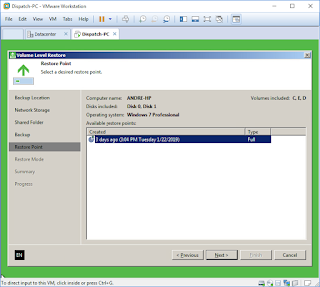
Pick your backup and corresponding point in time and click next

full vm recovery within minutes

You can choose to restore in manual mode, specific volumes or the entire machine. For a clean P2V I suggest to choose 'Entire Computer', but some partition will become obsolete (e.g. recovery partitions of the hardware vendor)

backup entire computer

When the target disk doesn't meet the size criteria you'll be informed. You can choose to replace the VM disk by a lager provisioned type, or start playing around with partitions and sizes.


You can also try to resize the source partition on the fly, the restore wizard will then analyze the volume's contents. If there is enough space on the target disk for the amount of data that has to be restored, you can also continue from here. (eg. a 1Tb disk with 20Gb of data can be easy restored to a 50Gb VM thin provisioned target drive)


The source and destination are now selected, pres Next and the bare metal restore process kicks in.

When completed, we just need to dismount the ISO, keep fingers crossed and reboot the machine.

And then the magic happens:


We have our physical machine converted to a VM. This makes this approach an ideal solution to get a lab up-and-running very fast from a backup which (must!) be present.


Does this sound interesting ?

We can help you with all your backup questions no matter if your environment is virtual, physical or cloud based. 
Get the most out of your environment with our audit services. 
We'll help you in optimizing your infrastructure (hardware, software and in terms of licenses) based on our hands-on experience, high certification levels and no-nonsense approach.


Saturday, January 5, 2019

Veeam Agent for Microsoft Windows version 3.0.0.748: A first look

We're already on version 3 of the Veeam endpoint backup. Things are going fast ! With version 3 a lot of new features are now available for your physical or cloud based Windows workloads.


I'll guide you through some interesting options which you didn't know they were there or became available as from version 3.

As from the first version, you have the ability to create a recovery media ISO. Did you know you can include the encryption key ? Put it on a safe place, but with this option you have a worry-free bare-metal recovery option. Although it's not the best solution, I dare to use full system backup and the recovery ISO as a P2V solution. Create a VM, boot the recovery ISO and start restoring. Ideal for loading physical machines in your lab for some testing...


After creating the recovery ISO, we can move on and create a backup job. If you already had the agent installed, the previous configured backup job will be maintained.

New in the layout we can now select from the left site the SETTINGS pane. These settings apply on all job(s) you create:


In this pane you can now configure:

General:

  • enable/disable scheduled backups
  • Throttle backup activity when system is busy
  • Manage network
  • Manage registered storage devices

Notifications:

  • Enable Control Panel notifications
  • Enable e-mail notifications


When manage network is chosen, you can limit the bandwidth consumption, but also the restrictions on metered connections are here configured. Now you can also restrict VPN connections usage and restrict Wi-Fi usage to certain networks.


A big plus is the fact that you can now have the ability to send mails regarding the status and success of your job(s).


I already talked about job(s), indeed plural, now you can configure multiple backup jobs on the agent. In the previous versions I had several machines which needed a backup on a 2h frequency. So I was juggling around with the task scheduler to fire the backup job every 2h. Now this is no longer necessary. Multiple jobs can be configured from the agent itself.

One big remark on this. On the FREE and WORKSTATION versions, you can't select the same target for a second job !You need a server license to select the same backup location.


In the server edition you can select the same target, but also (as in the previous version) a Veeam Cloud Connect repository or a Veeam backup repository.


Backup of USB-drives

When configuring a backup job, in version 3 you'll find now a checkbox 'include external USB drives'. When checked the data on the USB drive will be backed up with this job. I know this was a popular demand and now available. I'm not convinced that you should keep your primary copy of data on a USB drive. Today we have a lot of cloud-based offerings with or without offline synchronization possibilities, but there will be sure use-cases where backup of attached USB drives is a necessity.


Final thoughts

With version 3 Veeam further closes the gap in functionality between virtual and physical backups. With their central management, for both the agents and hypervisor environments you can manage your complete backup strategy from a single interface. Although, more work is still left. 
For example: Surebackup or decent backup testing and verification of machines which were backed up using the agents would give more peace of mind to the backup admins.

Do you need assistance to setup a robust backup strategy ? Already using Veeam but lacking performance ? We can audit your environment and think together about optimzations, modernizations or architectural changes. kristof@integri.services or https://integri.services