I was wondering if we could use the combination Veeam Endpoint Backup Free Edition and de bare-metal restore ISO to convert a physical PC into a VM running on ESXi.
To be short: the answer is YES
And it's pretty simple too. Maybe you already played around with the Veeam Endpoint Backup solution to safeguard your own desktop/laptop,... During the initial configuration process you have the ability to create a bootable ISO for bare metal restores.
This bootable ISO includes all necessary drivers to perform a bare metal restore on the same hardware, but what if we try to boot this ISO on a VM ? In the most ideal situation, you just create a new VM with the same amount of memory and vCPU, but I've tested it with less and it's working too.
More tricky is the provisioning of disk space. Make your disk big enough! Thin provisioning is fine, but you'll avoid a lot of issues when you reserve enough disk-space. Later on I'll show you what your options are when you didn't had enough disk available.
So, to start, we just create a blank VM with a corresponding OS profile.
On the ESXi environment, add some CPU, memory and don't forced the hard-drive !
Now that we have our empty VM with sufficient disk, we mount the ISO, which we created during our backup of the physical machine and boot the VM.
It's alive !
The Windows PE environment will come live and from the initial screen we can choose to perform a bare-metal restore.
The only challenge now is to gain access to the backup-file. In my lab, I used my NAS which contains the VBK-file.
So after entering a valid IP configuration in network settings, I was able to browse to my network location and select the corresponding backup file. The default network drivers enable you to create a working Ethernet connection in the PE environment.
The network location is scanned and all available backups are shown.
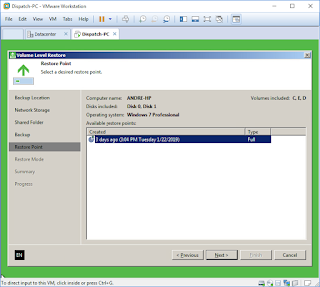
Pick your backup and corresponding point in time and click next
You can choose to restore in manual mode, specific volumes or the entire machine. For a clean P2V I suggest to choose 'Entire Computer', but some partition will become obsolete (e.g. recovery partitions of the hardware vendor)
When the target disk doesn't meet the size criteria you'll be informed. You can choose to replace the VM disk by a lager provisioned type, or start playing around with partitions and sizes.
You can also try to resize the source partition on the fly, the restore wizard will then analyze the volume's contents. If there is enough space on the target disk for the amount of data that has to be restored, you can also continue from here. (eg. a 1Tb disk with 20Gb of data can be easy restored to a 50Gb VM thin provisioned target drive)
The source and destination are now selected, pres Next and the bare metal restore process kicks in.
When completed, we just need to dismount the ISO, keep fingers crossed and reboot the machine.
And then the magic happens:
We have our physical machine converted to a VM. This makes this approach an ideal solution to get a lab up-and-running very fast from a backup which (must!) be present.
Does this sound interesting ?
We can help you with all your backup questions no matter if your environment is virtual, physical or cloud based.
Get the most out of your environment with our audit services.
We'll help you in optimizing your infrastructure (hardware, software and in terms of licenses) based on our hands-on experience, high certification levels and no-nonsense approach.


